docs/en/guides/isolating-segmentation-objects.md
Instance segmentation produces a pixel-precise mask for every detected object, which means you can lift each object out of an image on its own. This guide shows you how to turn Ultralytics YOLO segmentation results into isolated objects using Predict Mode and OpenCV, with either a solid black background or a transparent one for saving as PNG.
<p align="center"> <iframe loading="lazy" width="720" height="405" src="https://www.youtube.com/embed/5HBB5IBuJ6c" title="YouTube video player" frameborder="0" allow="accelerometer; autoplay; clipboard-write; encrypted-media; gyroscope; picture-in-picture; web-share" allowfullscreen> </iframe><strong>Watch:</strong> How to Remove Background and Isolate Objects with Ultralytics YOLO Segmentation & OpenCV in Python 🚀
</p>Pulling individual objects out of an image unlocks a range of downstream workflows:
The recipe works with any Ultralytics YOLO segmentation model and follows four stages: run inference → extract each contour → isolate the object → save the result.
Install the required libraries, then load a segmentation model (the -seg suffix, required to produce masks) and run prediction on your source image:
from ultralytics import YOLO

# Load a segmentation model
model = YOLO("yolo26n-seg.pt")

# Run inference on a source
results = model.predict(source="path/to/image.jpg")
!!! tip "No source? YOLO uses the bundled sample images"
If you call `model.predict()` without a `source`, Ultralytics falls back to the example images shipped with the package (`bus.jpg` and `zidane.jpg`), which is handy for quickly testing the workflow.
Each item in results corresponds to one image, and iterating over a result yields one detection at a time. For every detection, copy the original image, read the class label, and draw the object's mask contour onto a blank binary mask. The white region of this mask marks exactly which pixels belong to the object.
The snippets in this section and the next run inside the detection loop below; the complete, copy-paste script is in Full Example.
{ width="240", align="right" }
from pathlib import Path

import cv2
import numpy as np

for r in results:
    img = np.copy(r.orig_img)
    img_name = Path(r.path).stem  # source image base-name

    # Iterate each detected object in the image
    for ci, c in enumerate(r):
        label = c.names[c.boxes.cls.tolist().pop()]  # class name

        # Build a binary mask and draw the object contour onto it
        b_mask = np.zeros(img.shape[:2], np.uint8)
        contour = c.masks.xy[0].astype(np.int32).reshape(-1, 1, 2)
        cv2.drawContours(b_mask, [contour], -1, (255, 255, 255), cv2.FILLED)
!!! note "What does c.masks.xy[0].astype(np.int32).reshape(-1, 1, 2) do?"
- `c.masks.xy[0]` returns the [mask](../modes/predict.md#masks) contour as `(x, y)` point coordinates for the object in this single-detection result.
- `.astype(np.int32)` converts the points from `float32`, which OpenCV's `drawContours()` does not accept.
- `.reshape(-1, 1, 2)` reshapes the points into the `[N, 1, 2]` layout `drawContours()` expects, where `N` is the number of contour points.

Passing `[contour]` with the index `-1` draws all points of the supplied contour, and `cv2.FILLED` fills every enclosed pixel white.
With the binary mask ready, combine it with the original image. There are two common styles, depending on what you want the background to be:
!!! example "Choose an isolation style"
=== "Black background"
Convert the mask to three channels and keep only the pixels that overlap the object. Everything outside the contour becomes black:
```python
# Isolate object with a black background
mask3ch = cv2.cvtColor(b_mask, cv2.COLOR_GRAY2BGR)
isolated = cv2.bitwise_and(mask3ch, img)
```
<figure markdown>
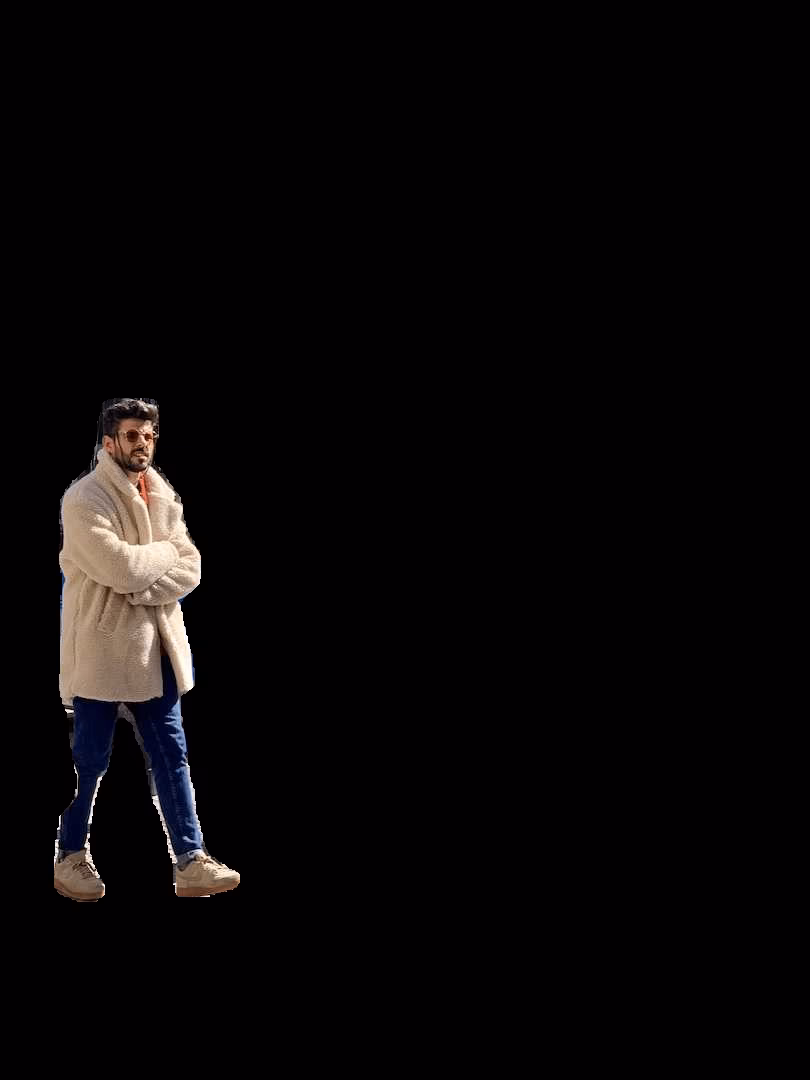{ width=240 }
<figcaption>Full-size object on a black background</figcaption>
</figure>
=== "Transparent background"
Stack the mask as a fourth (alpha) channel so pixels outside the contour become transparent when saved as a PNG:
```python
# Isolate object with a transparent background (save as PNG)
isolated = np.dstack([img, b_mask])
```
<figure markdown>
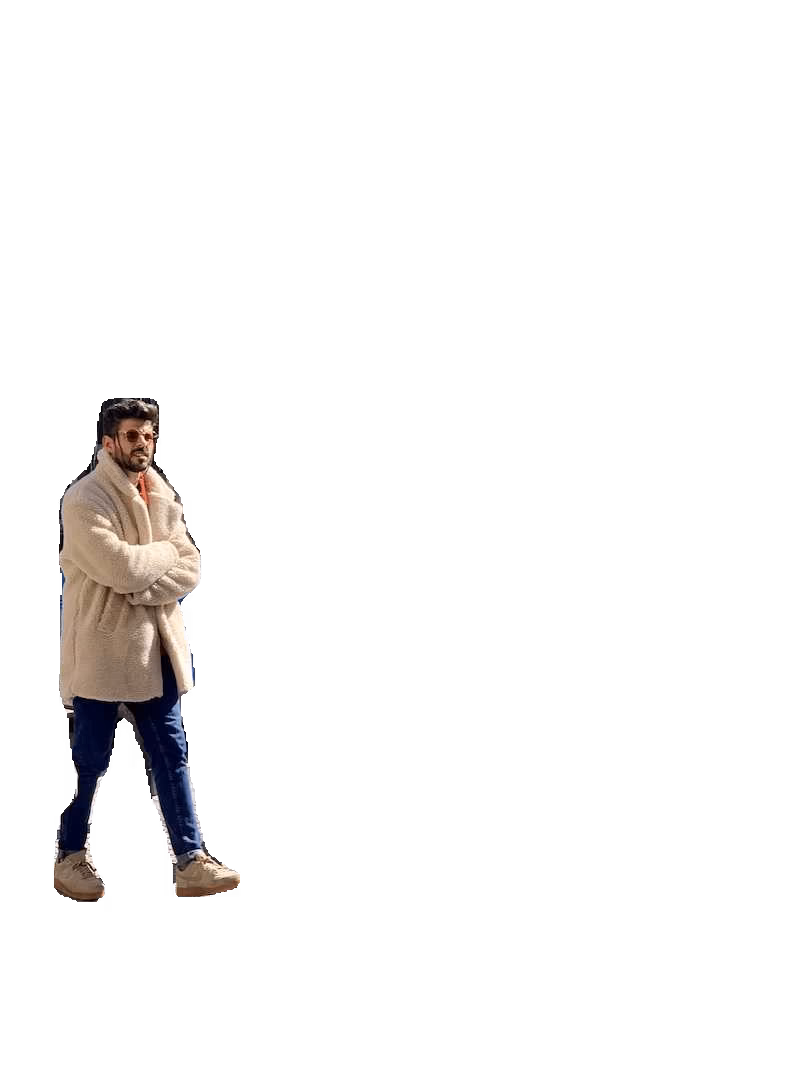{ width=240 }
<figcaption>Full-size object with a transparent background</figcaption>
</figure>
!!! tip "Crop to the bounding box"
To keep only the object's region instead of the full-size image, slice it to the detection's bounding box:
```python
# Bounding box coordinates
x1, y1, x2, y2 = c.boxes.xyxy.cpu().numpy().squeeze().astype(np.int32)
# Crop the isolated image to the object region
iso_crop = isolated[y1:y2, x1:x2]
```
<figure markdown>
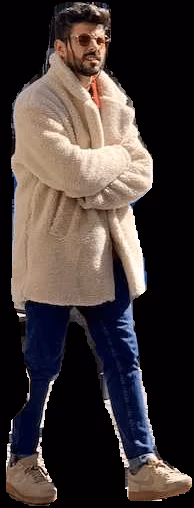{ width=240 }
<figcaption>Object cropped to its bounding box</figcaption>
</figure>
!!! tip "Need the crop with its original background?"
That is built in. Pass `save_crop=True` to [`predict()`](../modes/predict.md#inference-arguments) and Ultralytics saves bounding-box crops automatically, no masking required.
What you do with each isolated object is up to you. A common next step is writing it to disk for later use:
# Save the isolated object to file
cv2.imwrite(f"{img_name}_{label}-{ci}.png", isolated)
Here img_name is the source image stem, label is the class name, and ci is the detection index, so multiple instances of the same class get unique filenames. Swap isolated for iso_crop if you applied the optional crop above.
The script below combines every step into a single, runnable block. It uses a black background by default; switch the single marked line to np.dstack([img, b_mask]) for a transparent PNG instead:
from pathlib import Path

import cv2
import numpy as np

from ultralytics import YOLO

model = YOLO("yolo26n-seg.pt")
results = model.predict(source="path/to/image.jpg")

for r in results:
    img = np.copy(r.orig_img)
    img_name = Path(r.path).stem

    for ci, c in enumerate(r):
        label = c.names[c.boxes.cls.tolist().pop()]

        # Build a binary mask from the object contour
        b_mask = np.zeros(img.shape[:2], np.uint8)
        contour = c.masks.xy[0].astype(np.int32).reshape(-1, 1, 2)
        cv2.drawContours(b_mask, [contour], -1, (255, 255, 255), cv2.FILLED)

        # Isolate the object (black background)
        mask3ch = cv2.cvtColor(b_mask, cv2.COLOR_GRAY2BGR)
        isolated = cv2.bitwise_and(mask3ch, img)  # transparent PNG: isolated = np.dstack([img, b_mask])

        # Save or add your custom post-processing here
        cv2.imwrite(f"{img_name}_{label}-{ci}.png", isolated)

        # Optional: crop to the bounding box before saving
        # x1, y1, x2, y2 = c.boxes.xyxy.cpu().numpy().squeeze().astype(np.int32)
        # cv2.imwrite(f"{img_name}_{label}-{ci}.png", isolated[y1:y2, x1:x2])
For repeated use, wrap the loop body in a function so you can call it across many images.
You now have a complete recipe for isolating segmented objects with Ultralytics YOLO: run inference, build a binary mask from each contour, then extract the object on a black or transparent background and optionally crop it to its bounding box. Explore the full Segment Task and Predict Mode documentation to adapt the workflow to your own classes.
Load a segmentation model, run inference, build a binary mask from each detection's contour, and combine it with the original image:
import cv2
import numpy as np

from ultralytics import YOLO

model = YOLO("yolo26n-seg.pt")
results = model.predict(source="path/to/your/image.jpg")

img = np.copy(results[0].orig_img)
b_mask = np.zeros(img.shape[:2], np.uint8)
contour = results[0].masks.xy[0].astype(np.int32).reshape(-1, 1, 2)
cv2.drawContours(b_mask, [contour], -1, (255, 255, 255), cv2.FILLED)

mask3ch = cv2.cvtColor(b_mask, cv2.COLOR_GRAY2BGR)
isolated = cv2.bitwise_and(mask3ch, img)
See the Full Example for the complete per-detection loop.
There are two main styles. For a black background, convert the mask to three channels and use cv2.bitwise_and(). For a transparent background (when saving as PNG), stack the mask as a fourth alpha channel with np.dstack([img, b_mask]). Both are shown in Isolate the Object.
Read the bounding box coordinates from the detection and slice the isolated image:
x1, y1, x2, y2 = results[0].boxes.xyxy[0].cpu().numpy().astype(np.int32)
iso_crop = isolated[y1:y2, x1:x2]
Learn more about bounding box results in the Predict Mode documentation.
Ultralytics YOLO provides fast, real-time instance segmentation with accurate mask and bounding box generation, plus a simple Python API that turns inference results into isolated objects in a few lines of OpenCV code.
Yes. Use the save_crop argument in predict() to save bounding-box crops with their original background:
results = model.predict(source="path/to/your/image.jpg", save_crop=True)
Read more in the Predict Mode Inference Arguments section.